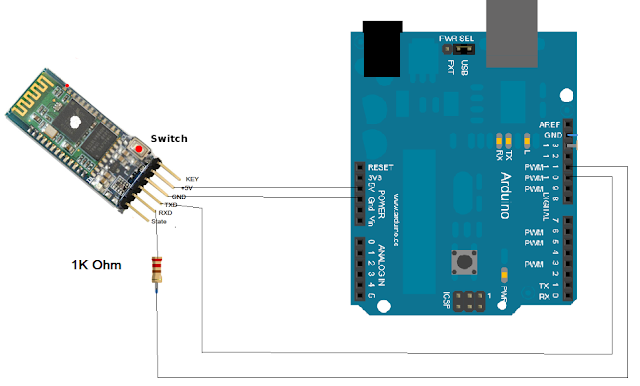
โหลดโปรแกรม code ด้านล่างลง arduino
/*
 Software serial multple serial test

 Receives from the hardware serial, sends to software serial.
 Receives from software serial, sends to hardware serial.

 The circuit:
 * RX is digital pin 10 (connect to TX of other device)
 * TX is digital pin 11 (connect to RX of other device)

 Note:
 Not all pins on the Mega and Mega 2560 support change interrupts,
 so only the following can be used for RX:
 10, 11, 12, 13, 50, 51, 52, 53, 62, 63, 64, 65, 66, 67, 68, 69

 Not all pins on the Leonardo support change interrupts,
 so only the following can be used for RX:
 8, 9, 10, 11, 14 (MISO), 15 (SCK), 16 (MOSI).

 created back in the mists of time
 modified 25 May 2012
 by Tom Igoe
 based on Mikal Hart's example

 This example code is in the public domain.

 */
#include <SoftwareSerial.h>

SoftwareSerial mySerial(10, 11); // RX, TX

void setup()
{
  Serial.begin(38400);
  while (!Serial) ;
  mySerial.begin(38400);
}

void loop()
{
  if (mySerial.available())
    Serial.write(mySerial.read());
  if (Serial.available())
    mySerial.write(Serial.read());
}
----------------------------------------------------------------------
ต่อวงจรตามรูป เพื่อ set ค่า HC-05 ผ่าน AT command
ไปที่โปรแกรม Arduino IDE
กดรูปแว่น Serial Monitor
ลองพิมพ์ AT จากนั้นกด Enter จะขึ้นว่า OK
คำสั่งเปลี่ยนชื่ออุปกรณ์ตอนเลือกเชื่อมต่อ
พิมพ์ AT+NAME="Device Name" แล้วกด Enter หากสำเร็จจะขึ้น OK
คำสั่งเปลี่ยนพาสที่ใช้จับคู่
พิมพ์ AT+PSWD=New Password
เมื่อต่อครบแล้ว Reset HC05
โดยกดปุ่มบนตัว HC05 ค้างไว้ แล้ว ถอด VCC 5V ออกแล้วเสียบใหม่
ทดลอง PIC microcontroller
คอมไพล code CCS แล้วอัดลง PIC
#include <16F627A.h>
#use delay(clock=4000000)
#fuses XT,NOWDT,NOPROTECT,NOPUT,NOBROWNOUT,NOLVP
#use rs232(baud=9600,parity=N,xmit=PIN_B2,rcv=PIN_B1,bits=8)
#use fast_io(A)
#use fast_io(B)

void main()
{
  char x;
  set_tris_b(0b00000010);
  set_tris_a(0b11111111);
  output_b(0b00000000);

  while(true)
        {
        if(kbhit())
           {
             x=getc();

              if (x=='A')
             {
             output_low(pin_b7);
             }
             if (x=='B')
             {
             output_high(pin_b7);
             }
             if (x==1)
             {
             output_low(pin_b0);
             }
             if (x==2)
             {
             output_high(pin_b0);
             }
           }
        }
  }
ต่อวงจรตามรูป
ขา RX ของ PIC ต่อกับ TX ของ HC-05
ขา TX ของ PIC ต่อกับ R 1K ohm และต่อกับ RX ของ HC-05
ต่อ R 1k ohm เนื่องจาก ขา RX TX ของ HC-05 ทำงานที่แรงดัน 3.3V แต่ขา PIC จ่ายไฟ 5V
Download โปรแกรม android ตาม link
ลงแล้ว
เปิด Bluetooth
เลือก Bluetooth
กด Click to connect
จากนั้นลองกด เปิดปิดไฟ ดู


ไม่มีความคิดเห็น:
แสดงความคิดเห็น