วันพฤหัสบดีที่ 15 ตุลาคม พ.ศ. 2558

สั่งงาน PIC และ arduino ผ่านมือถือ เชื่อมต่อโดย bluetooth

ใช้ IC HC-05 ในการส่งสัญญาณ bluetooth ติดต่อสื่อสาร


โหลดโปรแกรม code ด้านล่างลง arduino


/*
 Software serial multple serial test

 Receives from the hardware serial, sends to software serial.
 Receives from software serial, sends to hardware serial.

 The circuit:
 * RX is digital pin 10 (connect to TX of other device)
 * TX is digital pin 11 (connect to RX of other device)

 Note:
 Not all pins on the Mega and Mega 2560 support change interrupts,
 so only the following can be used for RX:
 10, 11, 12, 13, 50, 51, 52, 53, 62, 63, 64, 65, 66, 67, 68, 69

 Not all pins on the Leonardo support change interrupts,
 so only the following can be used for RX:
 8, 9, 10, 11, 14 (MISO), 15 (SCK), 16 (MOSI).

 created back in the mists of time
 modified 25 May 2012
 by Tom Igoe
 based on Mikal Hart's example

 This example code is in the public domain.

 */
#include <SoftwareSerial.h>

SoftwareSerial mySerial(10, 11); // RX, TX

void setup()
{
  Serial.begin(38400);
  while (!Serial) ;
  mySerial.begin(38400);
}

void loop()
{
  if (mySerial.available())
    Serial.write(mySerial.read());
  if (Serial.available())
    mySerial.write(Serial.read());
}

----------------------------------------------------------------------


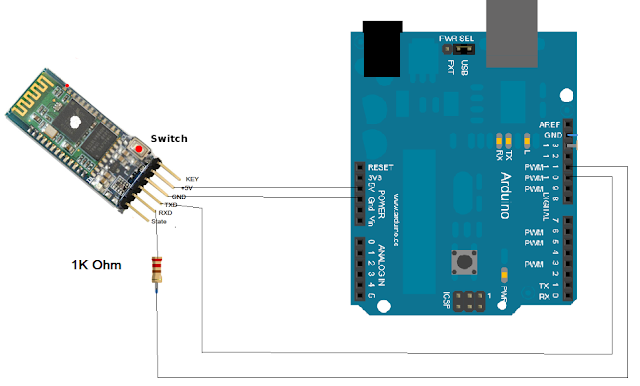
ต่อวงจรตามรูป เพื่อ set ค่า HC-05 ผ่าน AT command


ไปที่โปรแกรม Arduino IDE 

กดรูปแว่น  Serial Monitor 

ลองพิมพ์ AT จากนั้นกด Enter จะขึ้นว่า OK 

คำสั่งเปลี่ยนชื่ออุปกรณ์ตอนเลือกเชื่อมต่อ 
พิมพ์ AT+NAME="Device Name" แล้วกด Enter หากสำเร็จจะขึ้น OK

คำสั่งเปลี่ยนพาสที่ใช้จับคู่  
พิมพ์ AT+PSWD=New Password 

เมื่อต่อครบแล้ว Reset HC05
โดยกดปุ่มบนตัว HC05 ค้างไว้ แล้ว ถอด VCC 5V ออกแล้วเสียบใหม่


ทดลอง PIC microcontroller 

คอมไพล code CCS แล้วอัดลง PIC
  
#include <16F627A.h>
#use delay(clock=4000000)
#fuses XT,NOWDT,NOPROTECT,NOPUT,NOBROWNOUT,NOLVP
#use rs232(baud=9600,parity=N,xmit=PIN_B2,rcv=PIN_B1,bits=8)
#use fast_io(A)
#use fast_io(B)

void main()
{
  char x;                                   
  set_tris_b(0b00000010); 
  set_tris_a(0b11111111);
  output_b(0b00000000);      
  
  while(true)                              
        {
        if(kbhit())
           {        
             x=getc();
            
              if (x=='A')
             {
             output_low(pin_b7);
             }
             if (x=='B')
             {
             output_high(pin_b7);
             }
             if (x==1)
             {
             output_low(pin_b0);
             }
             if (x==2)
             {
             output_high(pin_b0);
             }
           }        
        }
  } 


ต่อวงจรตามรูป
ขา RX ของ PIC ต่อกับ TX ของ HC-05
ขา TX ของ PIC ต่อกับ R 1K ohm และต่อกับ RX ของ HC-05
ต่อ R 1k ohm เนื่องจาก ขา RX TX ของ HC-05 ทำงานที่แรงดัน 3.3V แต่ขา PIC จ่ายไฟ 5V


Download โปรแกรม android ตาม link
ลงแล้ว
เปิด Bluetooth
เลือก Bluetooth
กด Click to connect 
จากนั้นลองกด เปิดปิดไฟ ดู


วันอังคารที่ 13 ตุลาคม พ.ศ. 2558

Project เครื่องให้อาหารปลาอัตโนมัติ โดยใช้ PIC

เครื่องให้อาหารปลาอัตโนมัติ
โดยใช้ PIC microcontroller ตั้งเวลาจ่ายไฟ

วงจรสวิตซ์ใช้ Transistor  ดาร์ลิงตัน รับสัญญาณจาก PIC เพื่อตัดต่อการจ่ายไฟ 12 V


Code program CCS PIC 16F627A


#include <16F627A.h>
#use delay(clock=4000000)
#fuses XT,NOWDT,NOPROTECT,NOPUT,NOBROWNOUT,NOLVP
unsigned long i,j;
//www.konkarhoon.blogspot.com/
void delays(){
delay_ms(300000);
}//www.konkarhoon.blogspot.com/

void main(void)
{
    set_tris_a(0B00000000);

    while(1)
    {
     output_high(PIN_b0);
     output_high(PIN_b4);
         delay_ms(500);
     output_low(PIN_b0);
     output_low(PIN_b4);
     delay_ms(500);
   
     output_high(PIN_b0);   // ´feed
     output_high(PIN_b4);
   
         delays();
       
     output_low(PIN_b0);    // delay 12 hr
     output_low(PIN_b4);
     for(j=1;j<1440;j++){
         delays();
         }
     //www.konkarhoon.blogspot.com/
   
    }

}


วันเสาร์ที่ 10 ตุลาคม พ.ศ. 2558

การใช้ Transistor เป็นสวิตซ์ และ วงจร Darlington

ในการใช้ MCU PIC หรือ Arduino
บางครั้งเราจะใช้เปิดปิดวงจร 24 V หรือ 12V
แต่ MCU จ่ายไฟออกแค่ 5V

เราจึงใช้ Transistor เป็นสวิตซ์
แต่ พอใช้ Transistor ตัวเดียว ก็มีปัญหาในการขยายกระแส
จึงใช้ 2 ตัวเพื่อ แก้ปัญหานี้ซึ่งเรียกว่า วงจร ดาร์ลิงตัน


วันศุกร์ที่ 9 ตุลาคม พ.ศ. 2558

การใข้ printf VS fprint

fprint จะมีลักษณะคล้ายกับ printf
printf จะแสดงออกทางจอภาพ
fprint จะเป็นการบันทึกลงแฟ้มข้อมูล

format ที่ใช้กับ printf และ fprint มีดังนี้
%% - รูปแบบ %
%b - รูปแบบเลขฐานสอง
%c - รูปแบบตัวอักษรที่สอดคล้องกับ ASCII value
%d - รูปแบบเลขฐาน 10 แบบมีเครื่องหมาย
%e - รูปแบบสัญลักษณ์แบบวิทยาศาสตร์ เช่น 2.4e+2
%u - รูปแบบเลขฐาน 10 แบบไม่มีเครื่องหมาย
%f - รูปแบบเลขทศนิยมแบบมี local settings
%F - รูปแบบเลขทศนิยมแบบไม่มี local settings
%o - รูปแบบเลขฐาน 8
%s - รูปแบบString
%x - รูปแบบเลขฐาน 16 ตัวอักษรเล็ก
%X - รูปแบบเลขฐาน 16 ตัวอักษรใหญ่